Friday 29 May 2015

Disappearing Hour Glass

Having completed the Disappearing Pinwheel, it is now time to try this again placing the half square triangles in a different order.
In the Jenny Doan YouTube video, she started with 10 inch layer cakes and made 1/4-square triangles. I already had a bunch of turquoise blocks cut at 8 inches so that is what I used. Cutting is basically the same as the Disappearing Pinwheel.
According to Ms Doan, divide the width of your block by 3 and cut the strips in 3 equal sections ... which I did for the first blocks, but my finished blocks were 10 inches square and divided by 3 makes each cut at 3-1/4" & a bit. (Well, actually it makes it 3-1/3" but there is no 1/3 marking on the ruler)

So I flipped the outside -corner blocks and then turned the centre square. Here's a thing to remember when sewing everything back together ... make sure the little triangle points in the corner squares are facing out .... obviously I had a couple of seam ripping-out sessions.
These blocks look pretty good together .... but, the cutting measurement of dividing the block in three was annoying SO I changed my mind on the cuts and the pattern.

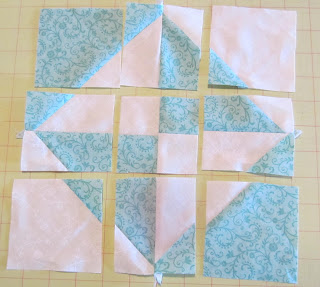
This time, I cut 1-1/2 inches from the centre seam (so the centre piece is 3 inches and the outside pieces are a wee bit larger.)
And I rearranged the pieces in a different order by turning every single cut piece!!

Outside corner squares were flipped so the little triangles faced the outer corners; the middle 4-piece square was rotated one turn .... and then I flipped the 4 narrow pieces (centres of outer edges) so those little triangles faced in.
VOILA!!


A small star pattern with a 4-square in the centre!! I think I like this better than the first blocks I was making above. 
Time to add a few more blocks.

One way to organize the blocks ....
And another way to organize the blocks.

Not sure which way I will choose. It looks like I will have to add another fabric to the mix ... I think I will need about 80 blocks in total to make a quilt top and there is not enough fabric in the two pieces I am currently using ..... and no, it does not mean a trip to the fabric store. I have lots of 1/2 and 1 and 2 metre pieces in my stash that I should be able to mix and match.

Disappearing PinWheel

A friend recently posted a picture of a 'disappearing' block that I had not tried ... the Disappearing Hour Glass. It turns out it had been created because someone had made a mistake in putting together a Disappearing Pinwheel block .... something that I have done, but carefully took apart and returned it to a proper pinwheel instead of thinking it was a new opportunity to create a new block!
(If you want to check out a YouTube video of the process, watch the Jenny Doan quilting tutorial on-line from the Missouri Star Quilt Company.)
First .... the original:
I started with 6 inch blocks (because that is the width of my ruler) and made half-square triangles. Cuts were made 1 1/2 inches from the centre line, the length of the block. This creates a mini-pinwheel in the centre. Each of the 4 centre side pieces were flipped.
And everything was sewn back together. I trimmed the finished block to 9 inches.
I have a lot of miscellaneous white-on-white material ... any one piece is not enough for a full quilt but when mixed together, gave me enough for a queen-sized bed quilt. The greens and blue are all fat quarters .... and the bits and pieces left over from cutting them into 6 inch square became strips in the border. (the coloured strip in the border is actually a mixture of blue and green fabrics which doesn't show up so well in this picture)

Having completed this a couple years ago, it was now time to try out the 'mistake' block ... the Disappearing Hour Glass!

Sunday 24 May 2015

Stormy Skies

Stormy Skies or Full Wind or ... not sure of a proper title at the moment.
     I painted the main floor of my house in greys and yellows this past winter and  wanted a picture that would tie everything together. At first I thought I would use my Dad's old sailboat as a model, but it was turquoise with a plain sail. Also, full pictures that I had showed the boat tied up at dock, not flying in the wind across the harbour. So with the help of the internet & Pinterest & imagination, this was the result. It is 47 cm X 76 cm (18.5 X 30 in)
     The sky is done in a ton of narrow rows of horizontal stitching ... which took forever. I changed thread to match each of the grey fabrics that I was working with. The water stitching follows all the little blue swirls in the fabric. Shading was added to the sides of the boat using a couple of colours of golds and browns.

     I found the water really frustrating. Originally it was going to be done in greys but after ripping out the first attempt, I decided to use blue fabric that actually looked a bit like water. I added a bit of dark blue & mid grey-blue in front of the sailboat BUT when I showed the partially finished piece to my Dad, his first comment was about a adding a line to the boom (which I did, thank you Dad) and then he asked why there was a pod of dolphins or minke whales in front of the boat.
     Obviously my waves didn't look like waves! Back to the drawing board or at least my sewing machine. I added a few more pieces of different shades of blue fabric and then sewed the heck out of the top of the waves to look like white caps.  The finished work is acceptable ... but I think I may need to practice water and waves and white caps on some small samples before I add it to a bigger piece of work.
     I watched a sailboat in the harbour yesterday afternoon; the wind was producing little white caps in the cove below us ... I am not sure the whitecaps in my art quilt line up properly with the billowing sail. Perhaps my boat is tacking.

Sunday 17 May 2015

North

     I am currently working on a piece that is giving me some frustration ... I want the water (waves) to have a more dimensional look, but after ripping out some sections yesterday, I think I will need to stick to flat stitching on fabric instead of trying to add lace and fabric folds. (Sorry, can't take a picture yet since there are a number of small pieces that will fall off if I try to hang it on the wall. I will clean up the mess and add some other details today and take a picture).  I will also need to check out some You-tube videos and see if someone else has gone in the direction that I want and then work on some small samples first.

     Instead, here is a picture of an Inuit piece I did in the fall of 1997. It had been a Christmas gift for my mother, reflecting the several years that we lived in northern Ontario, at the base of James Bay. This was a purchased pattern, that I have since misplaced or lost (thank you to the original creator). It was all hand-stitched / appliqued / hand-quilted before I knew about the wonders of Heat and Bond. I also didn't know much about turned edges on applique so the main pieces are done in blanket-stitch. The background fabric makes an excellent representation of the Northern Lights (aurora borealis). If I were to do something like this again, I would add a dog team, since that was the main transportation for most of the people at the time.

    ... which reminds me of a little story: on my way to church one Sunday morning while living in Moose Factory, I watched a young driver who did not have great control of his dogs, coming towards me on the snowy road. The dogs were weaving all over the place on the road instead of running in a straight line, so I climbed the snow bank and waited for them to pass. Except, they didn't pass ... not right away. The dogs made a bee-line for me; I sank in the deep snow and unable to move, crouched down. The dogs and the sled ran over me with their driver hollering and pulling the sled away. I'm glad it was not a loaded sled. I arrived at church a little bruised and very snowy and vowed the next time, that I would go early with my mother (who was the organist) instead of later on my own.
  
   Another little bonus ... I used Chris's suggestion for pinpointing the centre of the quilt before taking the picture ... and then I found that my computer has a program where I can actually 'tilt' the picture if I am a little wonky. I should have written down directions on where this program is since it was an accident that I found it at all!!

Saturday 9 May 2015

Sold a Quilt

     I put 3 quilts in the Centreville Quilt & Rug show that was held this weekend (actually, Friday and Saturday) ... and I sold one!! Yipee!! More money for fabric.
     The one that sold I named "Fall Bouquet" based on the pattern Winner's Bouquet by Akinson Designs. The top was machine-pieced and it was one of my early attempts at trying to machine quilt a queen-sized quilt top on my Husqvarna Viking. I am glad the 'throat' of the sewing machine is larger than regular sewing machines, but it really wasn't large enough to work on a queen-size. It was also a challenge getting the little points at the end of the curves to fit correctly ...
     Finished size was 102 X 88 -- beautiful fall colours.
     I have a few more quilt tops that need to be quilted, but anything larger than a twin bed will be sent off to a machine-quilter.
     There was a nice 'small' Husqvarna quilting machine at the show ... a Platinum 16 ... that would have been nice to bring home if I had a spare $7000+.  But if I am currently concentrating on smaller quilts, it is hard to justify the expense of a machine to do bed quilts.